Showing posts with label crafts. Show all posts

Friday, January 20, 2012

A DIY Chore Chart & Giveaway!

So I am not the DIY Crafty kind.. I try, but really it isn't me.

I am in love with Pinterest, but seriously I have no clue when I am supposed to have time enough to ever actually create any of the stuff I love on there!

But the hubs and I decided we needed to figure out how to give the girls an allowance.   We are in the camp that you don't get paid for chores.  Chores are expected, they are something you do because you are in a family, you live in a home.  As adults you don't get paid for chores, you just do them because they need to be done.  So, how do we accomplish giving them allowance that they can earn and teach them about the responsibility of chores?  Well, I had a great discussion with my friend D (who has a fab Etsy Shop ~ The Super Cute Boutique) and she is in the same arena my husband and I are.  Chores are Chores and you don't get paid for them (sorry to rat you out D).  But within that discussion, D and I developed a plan!  A LOOPHOLE to the no payment for chores sentiment.

The Plan:
  • The children will be required to do chores/tasks based on their age range (e.g. ages 2-3 appropriate chores).
  • They can do chores/tasks that are in the age range above theirs to earn money (e.g. ages 4-5 appropriate chores).
  • The chore tiles go up to about 16 years old and starts at ages 2 & 3.
  • Since our girls are ages 4 & 6, they will be required to do their daily/weekly chores based on ages 2-6.
  • To earn money they can do chores in the 7-9 age range (e.g. vacuuming, dusting, etc.).
  • We will use the white board to track their earnings and if they want to "bank" the money rather than physically keep it their banks.


The Creation of the Chore Chart:
(modified from Not So Idle Hands plans)

Here's what you need:
Then, I print out the names onto the paper and put the magnets on the back or you can adhere them with just a few pieces of double stick tape.

Print out your "Chore Tiles" and collect your items (the magnets, stickers, and "Chore Tiles").
 
  
Place the magnets on the back of your cut out "Chore Tiles" (you can skip the next step if you don't want to use the epoxy stickers and just print the "Chore Tiles" on a nice thick cardstock).
 

For the magnets, I used the epoxy stickers (make sure you don't touch the sticky side, you'll get fingerprints on them) and the sticker magnets. 
 

 Then CAREFULLY place the epoxy stickers to your "Chore Tiles" ... I used the magnets to hold the "Chore Tiles" so that I could place them on the super sticky epoxy stickers.


And here is our FINAL PRODUCT!!
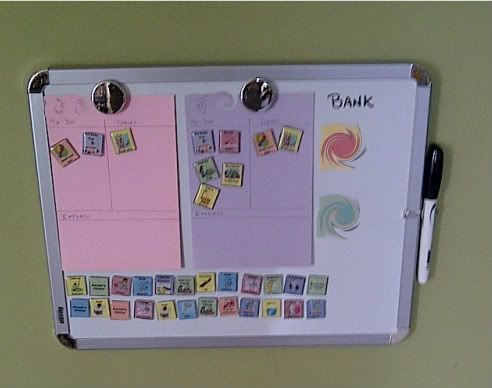

This process was quite time consuming, but I luckily had the help from "C"indy.. she happily stuck the magnets on the back of the "Chore Tiles" while I dealt with my epoxy stickers.. again CAREFULLY.  Oh, and I duplicated some of the tiles because each girl needs to be responsible for the chore (e.g. brushing their hair, brushing their teeth, taking a shower); whereas some chores really can only be accomplished by one person (e.g. feed the dogs).


And because I am the coolest blogger EVER.. I am giving you the pdf version of the "Chore Tiles"!!  Yup that is right.. for a limited time you've can win you're very own DIY CHORE CHART, from your's truly!  Just Click Here!!  After that they will be available on Etsy!  

     MMMWWWAHHH!!


Monday, March 15, 2010

Progress

Well, we made some significant progress on the T's Room... second coat of paint is up, touch-ups are completed, and the chair rail is up. I have a little bit of touch up to do (wood putty to fill in the nails and paint it to match the rest of the trim in the house), but all in all it looks wonderful!!  At least I am we are pleased with how it has turned out.  For now I am leaving the one wall bare, I think that the brown and the chair rail have added enough to the room, without the need for stripes or diamonds on one wall.
I hope to swap out the futon for the conversion crib this week/weekend.  And get a crib/toddler mattress for it, so that I can set it up as a toddler bed before the home study (on March 27th).  I've also picked out the bedding... it took forever to find something that wasn't exculsively for a baby, a boy, or a girl.  I know that there is plenty out there that is labeled "unisex" but when you really look at it, it either looks like something for a nursery or still somewhat girlie!  I really wanted something that would fit our age range (infant to 6 years old), and I am sorry but Bunnies just do not go with a 5 year old boy's bedroom.  So, I settled on the Dr. Seuss (thanks J!) ABC bed in a bag... it comes with top sheet, bottom sheet, pillow case, and quilt:
I really like the other items that they have, but think could be just too much of one theme.  I am hoping to accent the room with the colors in the polka dots (red, yellow, green, blue, etc.).  And maybe even find some Dr. Suess wall art... most likey I'll draw/paint something and frame them (yes, I have some artistic talent).  Oh, I have plenty of time to accessorize!

Monday, March 8, 2010

Calamities & Chaos

Well, P. & spent the weekend "attempting" to "spruce up" the future Tyke (or Tykette's) room (we'll just refer to it as "the T's room" from now on).  We have settled on a paint scheme (as I said in the prior post, we have TONS of paint in the basement and also have the Color Chart so that I can actually figure out what each can actually contained.  As I said before I have a variety of colors (but wanted to keep the T's room in nuetral tones.. browns, tans, begie.. bland basically, but still better than all beige.

We decided on Sherwin Williams (that is what is in the basement) Terra Brun & Macadmia.  The trim is already white, so we are going leave it as is, but add a chair rail on most of the walls, except one which will have stripes of the Brown & Beige colors.  I got to play with Sherwin Williams Visualizer (you can upload a photo and tape it off to show the color scheme.  The paint colors aren't exact, but still you can get the jist of what it will look like (hopefully, we can do a better job than I did in the editor):
Of course, as with any "do it yourself" home project, we had our issues....  the wall that has the wooden shelves on it also had this odd board (it was painted the color of the wall, but was just odd).  So we decided to remove it, in hindsight we should have left it as is... because we ended up putting a hole in the wall.  Thankfully, patching the hole wasn't difficult because the peice of the wall was still attached, so we pulled it back to being flush and patched it.  And then we thought it'd be a great idea to use a spray gun (you know like professional painters do?)... except there was one minor major problem.  We are not professionals... we are not even capable of being ametuers.  Using a spray painter means that you have to do A LOT of prep work... lots of taping and covering (we didn't do that)... so now we have overspray on the upper half of the wall.  Thankfully, I hadn't painted that portion... so that'll get completed this coming weekend.

Despite our "calamities" it was actually fun to get the room started.  So here's to putting the proverbial "cart before the horse" and purchasing a few items... here and there, to get the room ready for any future T's. 

Friday, March 5, 2010

Sprucin' it up...

So, the room we'll be using as the "Tyke's Room" is pretty bland, blah, and boring (see below).
I'd like to "Spruce" it up a bit, but I am not sure how or what to do, because I obviously want it to be "unisex" and fit a wide age range of children (infant to 6 years old).  I am not a fan of wallpaper or even wallpaper borders (although the house does have some of this stuff, its only because it was there when it we bought it -- it will come down... eventually).  I already have a vast supply of paint colors in the house (being it was the model home we got all the extra interior paint that was used in the home... lime green, hot pink, orange, yellow, light gray, dark gray, navy blue, gold, tan, beige and a few others). 

I think I want to keep it very "neutral"... the room is already beige.. so maybe adding some tan to it?!?  And I think I want it on this wall, because the other wall has these GORGEOUS wooden shevles.

So here are some photos that I found, of a few possiblities for the wall (I'll be doing whatever in tan and beige though):


So, do any of you have any other ideas that might work?  I don't want to do anything too extravagant and honestly, would like to use what I have in the house (why spend money when you don't have to, right?).  But I would like your input if you know of something that I haven't though of.

P.S. I added a "Checklist" of sorts to the tabs.  It includes our licensing requirements for foster care and some things that were reccomended by other foster parents that we might want to get prior to having our first placement.

Monday, November 23, 2009

We Live in a Zoo...

So, we have 3 dogs (two Sheltie Mixes and a Coon Hound <-- we adopted him in January to save him from being euthanized). And now we can add to the menagerie: a puppy, an elephant and a turtle!

Actually, we are lucky enough to have my parents, 3 of my 4 foster brothers, P.'s older sister, her husband, and our neice coming for Thanksgiving. And because we have family coming to visit, I decided it'd be fun to learn how to make Towel Origami (those towel animals on the cruise ships).

Here are the creations:

A Puppy!
An Elephant!
A Turtle!


The names of the animals include links to the YouTube videos I used to create the Towel Animals.. if anyone is interested in learning. You can also search YouTube by typing "how to make a towel animal" or "Towel Origami".. they have a variety of videos that teach you how to make Rabbits, Swans, Ducks, Mokeys, Seals, and even a simple Folded Shirt. You can add sunglasses or chocloates for the features of the animals (eyes, nose, and buttons).

LinkWithin

Related Posts Plugin for WordPress, Blogger...