
I am in love with Pinterest, but seriously I have no clue when I am supposed to have time enough to ever actually create any of the stuff I love on there!
But the hubs and I decided we needed to figure out how to give the girls an allowance. We are in the camp that you don't get paid for chores. Chores are expected, they are something you do because you are in a family, you live in a home. As adults you don't get paid for chores, you just do them because they need to be done. So, how do we accomplish giving them allowance that they can earn and teach them about the responsibility of chores? Well, I had a great discussion with my friend D (who has a fab Etsy Shop ~ The Super Cute Boutique) and she is in the same arena my husband and I are. Chores are Chores and you don't get paid for them (sorry to rat you out D). But within that discussion, D and I developed a plan! A LOOPHOLE to the no payment for chores sentiment.
The Plan:
- The children will be required to do chores/tasks based on their age range (e.g. ages 2-3 appropriate chores).
- They can do chores/tasks that are in the age range above theirs to earn money (e.g. ages 4-5 appropriate chores).
- The chore tiles go up to about 16 years old and starts at ages 2 & 3.
- Since our girls are ages 4 & 6, they will be required to do their daily/weekly chores based on ages 2-6.
- To earn money they can do chores in the 7-9 age range (e.g. vacuuming, dusting, etc.).
- We will use the white board to track their earnings and if they want to "bank" the money rather than physically keep it their banks.
The Creation of the Chore Chart:
Here's what you need:
- A magnetic white board (my choice 11" x 14")
- Epoxy Stickers (scrabble tile size)
- Magnets (with stickers)
- 2 sheets of 4"x 6" piece of scrapbook paper
Then, I print out the names onto the paper and put the magnets on the back or you can adhere them with just a few pieces of double stick tape.
Print out your "Chore Tiles" and collect your items (the magnets, stickers, and "Chore Tiles").


Place the magnets on the back of your cut out "Chore Tiles" (you can skip the next step if you don't want to use the epoxy stickers and just print the "Chore Tiles" on a nice thick cardstock).


For the magnets, I used the epoxy stickers (make sure you don't touch the sticky side, you'll get fingerprints on them) and the sticker magnets.


And here is our FINAL PRODUCT!!

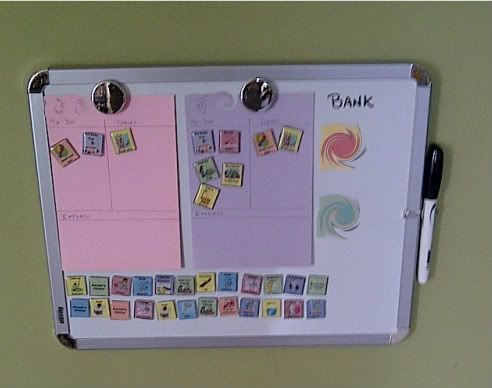
This process was quite time consuming, but I luckily had the help from "C"indy.. she happily stuck the magnets on the back of the "Chore Tiles" while I dealt with my epoxy stickers.. again CAREFULLY. Oh, and I duplicated some of the tiles because each girl needs to be responsible for the chore (e.g. brushing their hair, brushing their teeth, taking a shower); whereas some chores really can only be accomplished by one person (e.g. feed the dogs).
And because I am the coolest blogger EVER.. I am giving you the pdf version of the "Chore Tiles"!! Yup that is right.. for a limited time you've can win you're very own DIY CHORE CHART, from your's truly! Just Click Here!! After that they will be available on Etsy!
MMMWWWAHHH!!


Where did you find and print your chore tiles?
ReplyDelete